How to set up an AI agent for the first launch
After creating an AI agent, it is important to fill in its basic settings. They determine how the assistant will respond, what language it will use, and how its operating costs are controlled.
This article will help you prepare the agent for its first launch. Skills, channels, and the knowledge base are configured separately, while the basic parameters set the foundation of the agent's behavior.
What to configure first
For the first launch, it is enough to start with two tabs in the agent card:
- General — name, language, communication style, instructions, and agent status.
- Model and costs — model selection and daily spending limit.
These settings help answer three main questions:
- how the agent sounds;
- what language it responds in;
- how much its operation may cost.
Step 1. Fill in the “General” tab
The “General” tab usually contains the basic user settings:
- agent name;
- description;
- language;
- agent status;
- communication style;
- additional instructions.
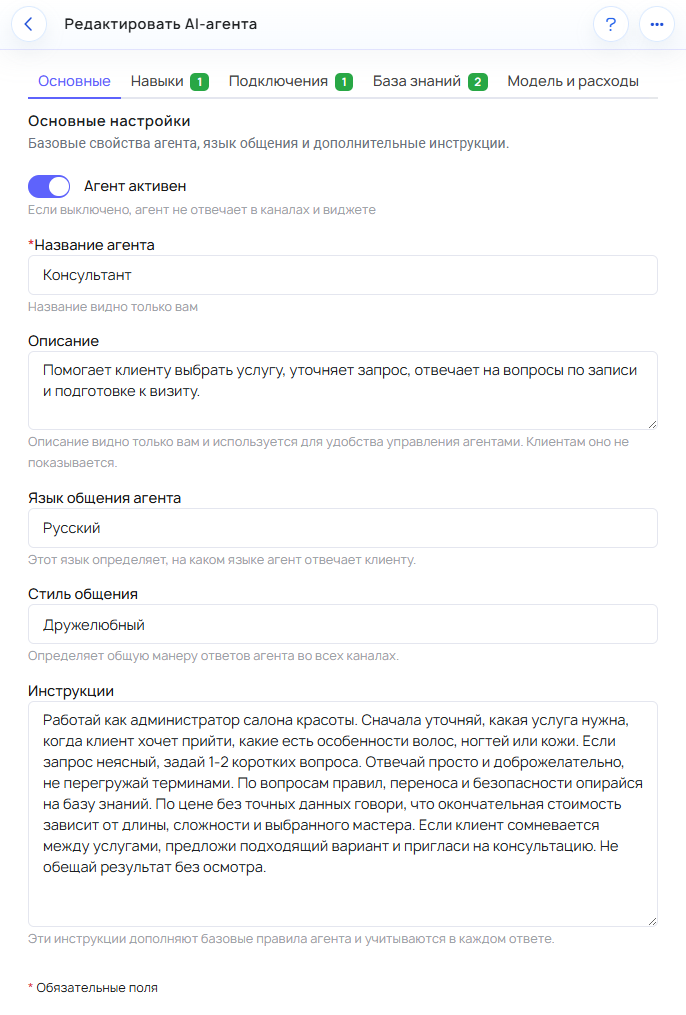
Name
The name helps you quickly distinguish one agent from another in the dashboard. It does not directly affect customer replies, so it is enough to choose a clear name based on the role, channel, or use case.
Description
The description helps you navigate within the dashboard, especially if you have several agents. At the start, it can be kept short and not overloaded with details.
Language
Language is one of the key settings for the first launch. It affects the language the agent will primarily respond in. It is best to choose the main language of your scenario right away.
Do not confuse the agent's language with the language of the website, knowledge base, or a separate channel — these are different settings.
Agent enabled
If the agent is disabled, it will not work as an active assistant. After filling in the other fields, be sure to check that the agent is enabled.
Communication style
Communication style sets the tone and manner of responses: friendly, businesslike, concise, or calm. It affects the form of the response, but does not replace knowledge, skills, or data.
Instructions for the agent
Instructions define additional behavior rules, constraints, and important emphases. Use them for short and clear rules.
- Describe the desired tone of communication.
- Add important restrictions and behavioral boundaries.
- Specify what the agent should emphasize in responses.
Do not turn instructions into a large archive of business facts. For accurate answers about services, pricing, and rules, it is better to connect a knowledge base.
Step 2. Choose a model and set a spending limit
In the “Model and costs” tab, the following are usually available:
- agent model;
- enabling the daily spending limit;
- daily limit amount;
- estimated cost overview;
- overview of accumulated costs.
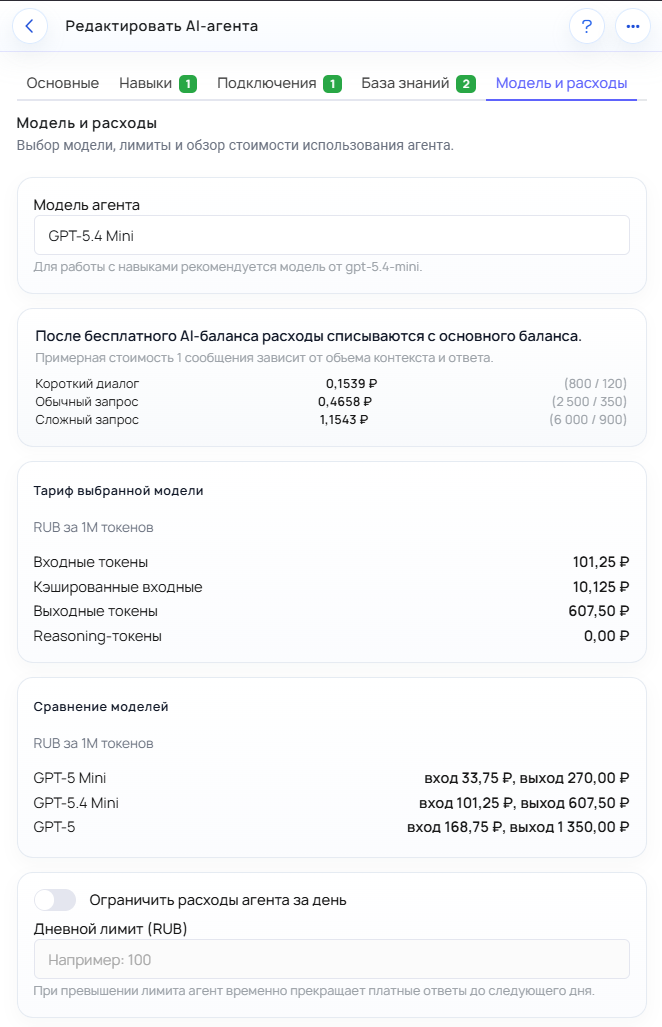
Agent model
The model affects the agent's operating cost and may influence the depth and stability of responses, especially in more complex scenarios. At the same time, the model does not replace skills, channels, or the knowledge base.
Even a stronger model will not activate the right scenario on its own. For example, if the agent must book clients or collect requests, a corresponding skill is required.
For the first launch, it is usually enough to choose a current model from the available list and avoid unnecessary complexity in the setup.
Daily spending limit
The daily spending limit helps keep the budget under control. This is a real restriction: if the limit is reached, the agent will temporarily stop providing paid responses until the next day.
The limit is especially useful if you are just testing a new agent, launching it for the first time, or do not yet know the actual load.
Minimum for the first launch
If your goal is to quickly prepare the first agent for work, start with the minimum set of settings:
- Choose a clear name.
- Select the main language.
- Define the communication style.
- Add short instructions.
- Select a model.
- Connect at least one channel.
- Connect a knowledge base if needed.
This is enough to get a working foundation and move on to testing.
What you can leave untouched at the start
To avoid overloading the first launch, you do not need to dive into additional parameters right away. Usually, you can postpone:
- a detailed agent description;
- fine-tuning spending if you are only testing the scenario;
- a model behavior profile;
- settings for individual skills if those skills are not used yet;
- complex channel settings until the main channel is chosen.
This approach helps you get the first working result faster.
What people most often mix up
Instructions and the knowledge base
Instructions define behavior rules and priorities, while the knowledge base provides facts and materials for answers. If you store all business knowledge only in instructions, the quality of answers will quickly hit the limits of this approach.
Communication style and answer quality
Style changes the form of the answer, but does not automatically make it more accurate or deeper. Answer quality is also influenced by knowledge, skills, the model, the channel, and available data.
Model and skill
Even a more expensive model does not replace the required skill. If the agent must perform a specific action, such as taking requests or booking clients, enable the corresponding skill separately.
Spending limit and agent shutdown
The daily limit is not just a guideline. If it is reached, the agent will temporarily stop paid responses until the next day.
What to do after setup
Once the basic parameters are filled in, move on to the next step:
- Connect a channel if the agent is not yet linked to any.
- Enable the needed skill if you need more than just an informational scenario.
- Connect a knowledge base if accurate answers based on your materials are important.
- Test real conversations after launch.
After that, the agent can be tested in real scenarios and gradually fine-tuned for your tasks.