How to connect VK to an AI agent
The VK channel is needed so the AI agent can reply to messages from your VK community. The main first-line scenario is text messages.
Important: the channel is considered connected only after the Callback API is fully configured in VK and a test message is sent. A successful token check alone is not enough.
What you need beforehand
- You already have a VK community.
- You have access to that community’s settings.
- The AI agent has already been created.
- The AI agent is enabled.
What data you will need
- Channel name — set in Mobitsa.
- Group token — created in VK and pasted into Mobitsa.
- VK confirmation string — shown in VK and pasted into Mobitsa.
- Callback API secret key — taken from Mobitsa and pasted into VK.
- Callback API address — taken from Mobitsa and pasted into VK.
Step 1. Add the VK channel in Mobitsa
- Open the required AI agent.
- Go to the Channels section.
- Add a new VK channel.
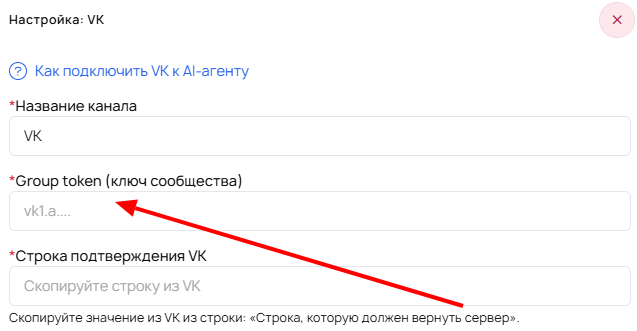
Step 2. Get the data from the VK channel form
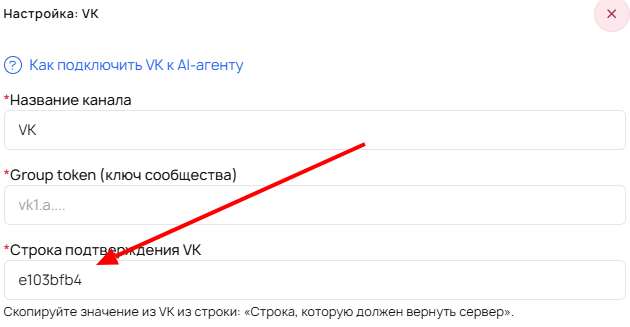
In the VK channel form, you will need the following fields and values:
- Channel name.
- Group token.
- VK confirmation string.
- Callback API secret key to copy.
- Callback API address to copy.
At this stage, it is important to remember the data sources: Group token and VK confirmation string come from VK, while Callback API secret key and Callback API address are taken from Mobitsa.
Step 3. Prepare the VK community
- Open the VK community.
- Go to Management.
- Open the Messages section.
- Enable Community messages.
- Then open Management → Additional → API usage.
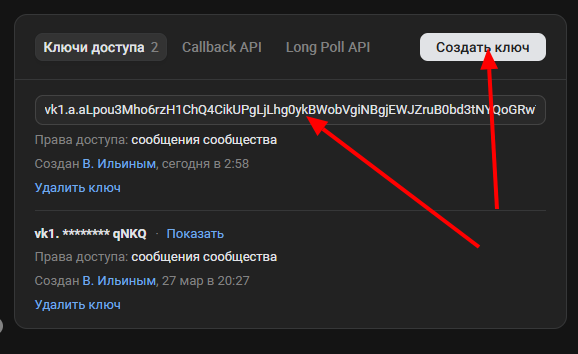
Step 4. Get the Group token in VK
In the API usage section, create an access token for community messages.
- Create an access token.
- Copy it.
- Paste the value into the Group token field in Mobitsa.
This token is used to verify access to the community.
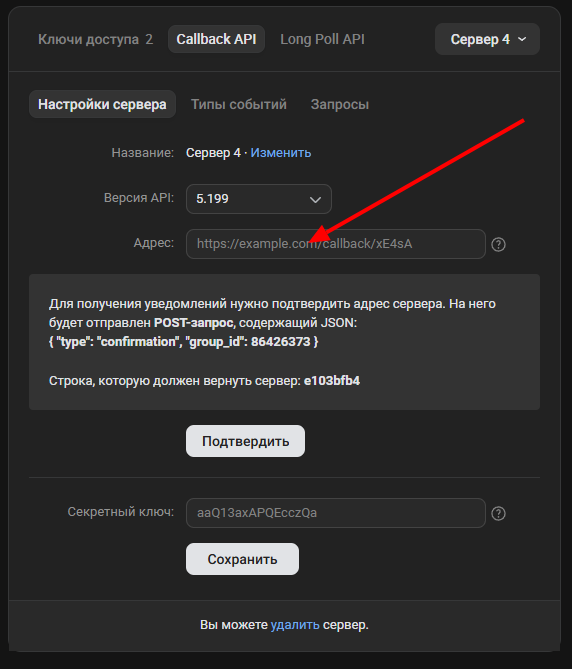
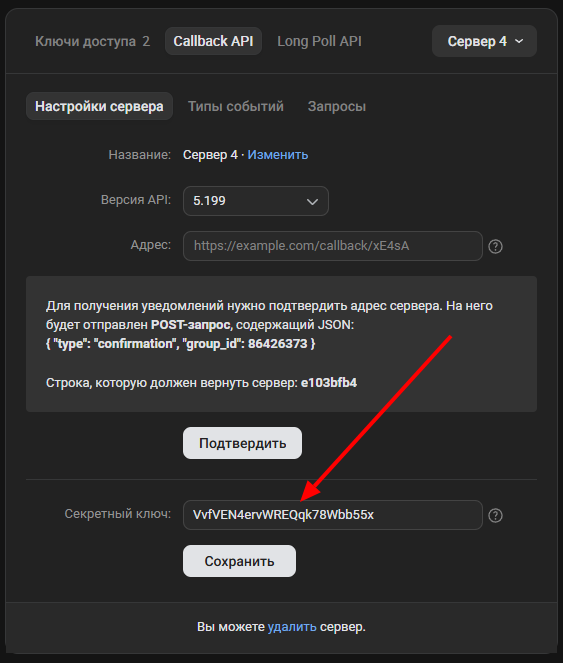
Step 5. Add the Callback API server
In the Callback API tab in VK, add a server.
- Open the Callback API tab.
- Click add server.
- Paste the Callback API address from the VK channel form in Mobitsa into the server address field.

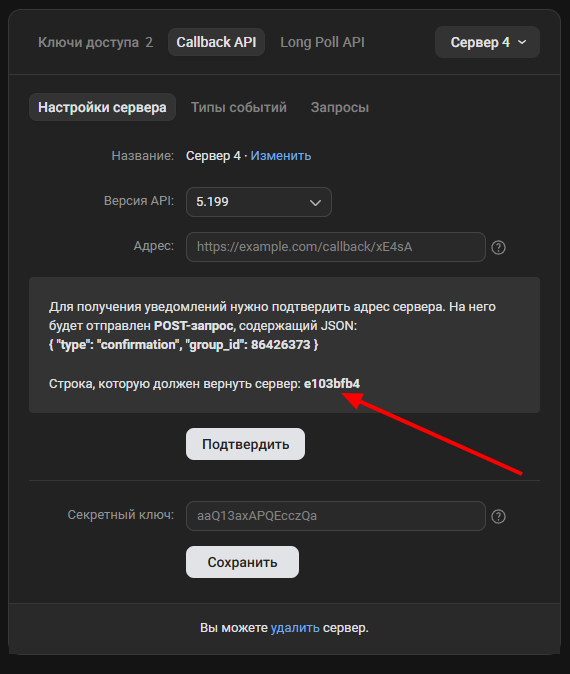
Step 6. Copy the VK confirmation string
After adding the server, VK will show a string like "String that the server must return".
- Copy this string in VK.
- Paste it into the VK confirmation string field in Mobitsa.
- Return to VK and click Confirm.
Important: the confirmation string is issued by VK, not Mobitsa.
Step 7. Specify the Secret key
- Copy the Callback API secret key from Mobitsa.
- Paste it into the Secret key field in the Callback API settings in VK.
Important: the Callback API secret key is taken from Mobitsa, while the VK confirmation string comes from VK.

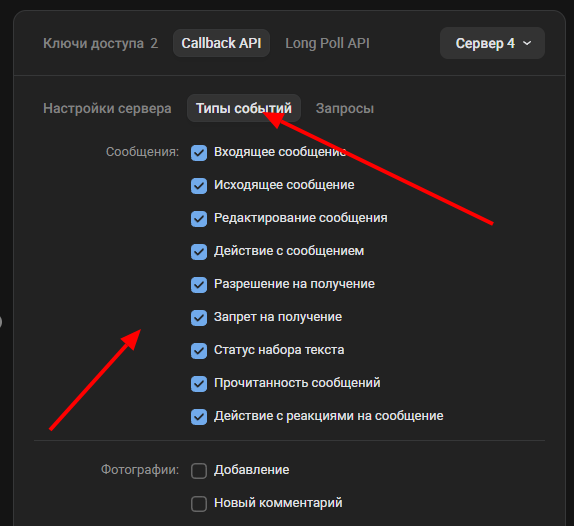
Step 8. Enable message events
After setting up the server, open the Event types section in VK and enable events from the Messages block.
This is a required step. Even if the token is verified and the server is added, messages will not reach the channel without events.
Step 9. Check the token in Mobitsa
Return to Mobitsa and click Check token.
After a successful check, click Save in the agent channel.
A successful check only confirms that the community token is correct. It does not mean the whole channel is fully working yet.
Step 10. Send a test message
- Send a message to the VK community messages.
- Return to Mobitsa.
- Check whether a new dialog appears.
- Check whether the AI agent replied.
The test message is the final connection check.
How to know VK is connected correctly
- Token check was successful.
- Callback API is configured.
- Message events are enabled.
- A test message was received.
- A dialog appeared in Mobitsa.
- The AI agent replied.
What to do if the channel is not working
- Check whether the Group token is entered correctly.
- Make sure the Callback API address from Mobitsa is specified in VK.
- Check whether the VK confirmation string field is filled in.
- Check whether the Callback API secret key is entered.
- Make sure events from the Messages section are enabled in VK.
- After setup, send a new test message.
If the token passes the check but there are no dialogs, the cause is usually related to the Callback API or event settings.
What not to confuse
- Group token — the community access token from VK.
- VK confirmation string — the string shown by VK.
- Callback API secret key — the value from Mobitsa for VK settings.
- Callback API address — the server address from Mobitsa for VK settings.
Remember: the channel is considered working only after a successful test message and a dialog appears in Mobitsa.